Digitizing vinyl means recording the analog signal coming off your turntable into a digital file you can play anywhere. Done properly, a clean LP captured at 24-bit/96kHz through a decent phono stage is indistinguishable from the record in a blind test — the limiting factor is almost never the converter. It’s your setup, your cleaning, and your levels.
I run a Technics SL-1200-class direct-drive deck next to a rebuilt Rega P3 and a Pro-Ject belt table, and I’ve digitized off all three — thrift finds, originals I didn’t want to wear out, and records that simply never got a decent reissue. This guide is the whole chain in the order that actually matters, because the order is where most people go wrong. They buy a converter and ignore the stylus. The signal is only ever as good as the worst link, and on a turntable the worst link is usually upstream of the computer.
What “Digitizing Vinyl” Actually Means (and What It Doesn’t)
Digitizing is the process of converting the continuous electrical signal your cartridge generates into a stream of numbers — samples — that a computer stores as a WAV, FLAC, or AIFF file. You are not “ripping” the record the way you rip a CD; there’s no perfect data layer to copy. You are making a fresh recording of a physical performance, in real time, one side at a time.
That distinction matters. A CD rip is bit-perfect because the data already exists as bits. A vinyl capture is a recording — it carries everything in the groove at the moment the stylus traces it, including the dust you forgot to brush off and the resonance from a wobbly shelf. Get the front end right and the file is gorgeous. Get it wrong and no software cleanup will rescue it. That’s the single idea this entire cluster is built around.
What it doesn’t mean: it doesn’t mean you need a $2,000 converter, and it doesn’t mean a USB turntable’s built-in chip is automatically junk. Both extremes are marketing. The honest middle is what I’ll lay out.
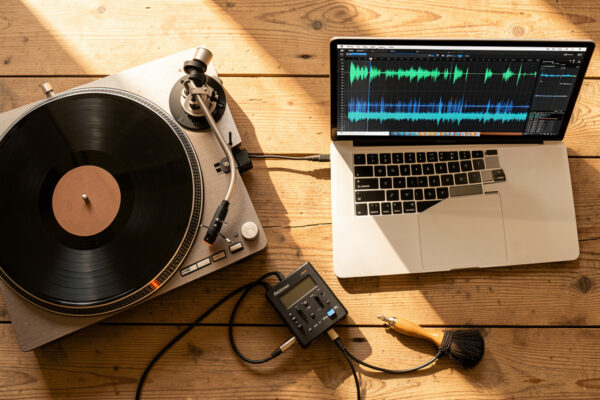
The Signal Chain: How a Record Becomes a File
Every vinyl capture follows the same path, and understanding it tells you exactly where your money and attention should go. Cartridge reads the groove → tonearm carries the tiny voltage → phono stage applies RIAA equalization and brings it up to line level → analog-to-digital converter (ADC) samples it → computer stores the file. That’s it. Five stages, and only one of them is the computer.
The phono stage is non-negotiable and the part beginners skip. A cartridge outputs a few millivolts on a curve that’s deliberately distorted at the cutting lathe — bass cut, treble boosted — to fit more music in the groove. The phono stage reverses that curve (RIAA equalization) and amplifies the signal up to line level. Feed a raw phono signal straight into a line input and you get a thin, quiet, bass-shy recording that no amount of EQ will properly fix. If you want the full reasoning, I wrote a dedicated phono stage guide on gain, loading, and MM/MC, and a plainer-language explainer on why you need a phono preamp at all.

The ADC is where the analog becomes digital. This lives inside a USB turntable, inside a standalone audio interface, or inside a dedicated USB phono box. The converter quality matters far less than people fear — even modest modern converters are transparent — but the analog stage feeding it matters enormously. That’s the whole “USB turntable vs. real deck plus interface” decision, which I’ll get to next.
Two Roads: USB Turntable vs. Your Real Deck Plus an Interface
There are exactly two sensible ways to digitize, and which one is right depends entirely on what you already own and how much you care about the result. A USB turntable bundles everything — cartridge, phono stage, ADC — into one box you plug into your laptop. A “real deck plus interface” means using a proper turntable through a separate phono stage into a standalone audio interface for vinyl digitizing. The first is convenience; the second is ceiling.
I’ve used both, and here’s the unromantic truth: a $150 USB turntable will produce a perfectly listenable digital file of a record, and for casual archiving of a worn collection it’s genuinely fine. But the cartridge and phono stage in those decks are built to a price, and you can hear it on quiet passages and high frequencies. If you already own a decent turntable, the answer is almost always to use it. Read the full comparison in my best USB turntable for digitizing breakdown.
| Factor | USB Turntable (all-in-one) | Real Deck + Interface |
|---|---|---|
| Typical entry cost | $120–$350 | $300+ deck, $120+ interface (or use what you own) |
| Cartridge quality | Budget bundled MM, often conical | Whatever you mount — up to MC |
| Phono stage | Built-in, fixed, basic | Separate, switchable gain/loading |
| ADC quality | Adequate (16-bit/48kHz common) | 24-bit/96kHz+ on most interfaces |
| Upgrade path | None — it is what it is | Every link improvable independently |
| Setup effort | Plug and play | Cabling, levels, driver install |
| Best for | Casual archiving, worn records | Keeper records, audiophile results |
One nuance the spec sheet hides: a bundled USB turntable’s cartridge is usually pre-aligned at the factory, which removes a setup variable but also caps your quality. With a real deck you control cartridge alignment and tracking force and anti-skate yourself — more work, but it’s the difference between a flat capture and a great one.
Spend It in the Right Order
This is the part of digitizing that nobody puts first, so I will: the order you invest effort is cleaning → setup → phono stage → cartridge → converter. That’s the reverse of how most people approach it. They obsess over sample rates while playing a dusty record through a misaligned cartridge into a wobbly shelf. The converter is the last thing that will ever bottleneck your capture, and it’s the first thing people spend on.
Cleaning comes first because every pop and tick you capture is permanent in the file, and most of them are dust, not damage. Setup comes second because a mistracking stylus adds distortion that sounds exactly like a worn record. The phono stage comes third because it shapes the entire tonal balance. The cartridge comes fourth. The converter comes dead last, because a transparent ADC costs less than a tank of fuel now. Internalize that order and your captures will beat someone’s who spent five times as much in the wrong sequence.
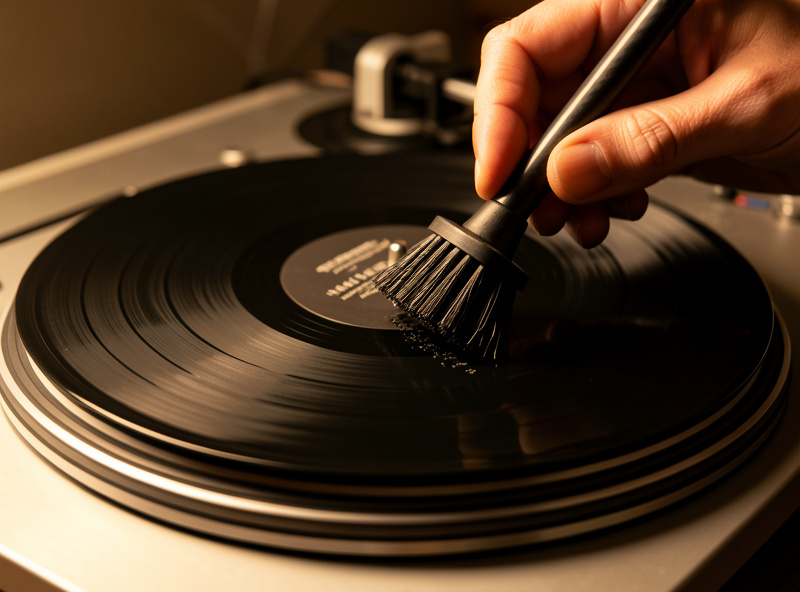
Cleaning Before You Capture (Non-Negotiable)
I clean every record before I digitize it, without exception, because the digital file is forever and the dust is not. A carbon-fiber brush pass removes loose surface dust before every play; a proper wet clean lifts the embedded grime that causes the persistent crackle. The difference on a captured file is dramatic — I’ve taken records that sounded hopeless and turned them into clean transfers with nothing more than a wet clean and a new inner sleeve.
For a record you’re keeping, do a full wet clean first — see my wet cleaning method that actually works and the dedicated cleaning records before digitizing walkthrough. Thrift finds and anything with visible mold need the deeper treatment in my guide to cleaning used records. The broader complete record cleaning guide and a comparison of cleaning brushes cover the tools. Static is the other capture-killer — a charged record attracts dust mid-play, so manage it with the methods in my anti-static guide.
Setup: Why Tracking Force and Alignment Decide the Capture
A stylus that mistracks doesn’t just sound bad live — it bakes that distortion into your file permanently. Tracking force outside the cartridge’s spec range, badly set anti-skate, or poor alignment all produce inner-groove distortion and sibilance that you’ll hear on every vocal you capture. I set VTF with a digital gauge to 0.01g, dial anti-skate against the cartridge’s recommendation, and align overhang on a two-point protractor before any session that matters. Early on I digitized a whole batch with anti-skate set by eye and only later spotted the asymmetric sibilance riding the right channel — I ended up re-capturing every one.
If your deck isn’t dialed in, fix that before you record a single side. My turntable setup and calibration guide walks through the whole process, and setting up a turntable for the first time covers the basics if the deck is new. Speed stability matters too — a deck with audible wow and flutter will pitch-wobble your capture, which is one more reason the belt-drive vs direct-drive question is worth understanding even though it’s wildly over-fought.
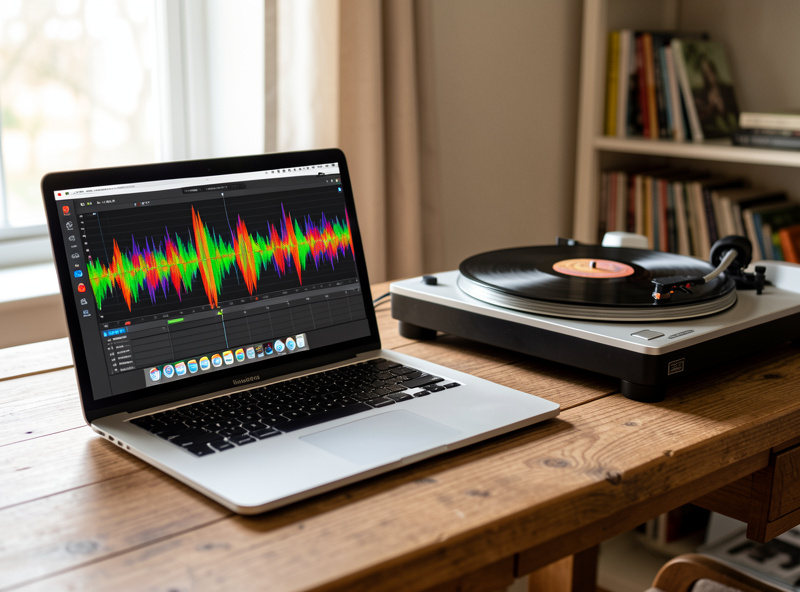
Choosing Your Recording Software
The software is the cheapest decision in the chain and the one people overthink. Audacity is free, cross-platform, and does everything a home archivist needs — record, split tracks, remove clicks, export FLAC. For most people that’s the entire answer. I keep a full Audacity turntable recording walkthrough precisely because it’s where I’d point a beginner first.
Paid options exist — VinylStudio, and the higher-end DAWs — and they add convenience features like automatic track detection against an online database and better declicking. Whether they’re worth it depends on your volume; if you’re archiving 300 records, the time savings add up. I compare the realistic options in my best software for digitizing vinyl roundup. The headline: start free with Audacity, and only pay once you’ve hit a wall you can actually name.
Sample Rate, Bit Depth, and File Formats
Record at 24-bit and at least 48kHz; 96kHz is the sweet spot for archiving and 192kHz is overkill that just doubles your file size. Bit depth (24 vs 16) is the one that genuinely matters for capture, because the extra headroom means you can set conservative levels and never clip. Sample rate beyond 96kHz captures frequencies neither the record nor your ears contain.
For the archive master, save lossless: WAV or AIFF for the working file, FLAC for the stored copy (lossless, tagged, roughly half the size of WAV). Make your MP3s or AACs from the FLAC afterward if you want compressed copies for the car or phone — never digitize straight to a lossy format, because you can always compress a lossless master later but you can never get the data back. I treat the FLAC as the negative and everything else as prints.
| Setting | Recommended | Why |
|---|---|---|
| Bit depth | 24-bit | Headroom to avoid clipping; matters most |
| Sample rate | 96kHz | Transparent ceiling; 192kHz wastes space |
| Master format | FLAC (lossless) | Tagged, ~half WAV size, no quality loss |
| Listening copies | 320kbps MP3 / AAC | Made from the FLAC, for phone/car |
| Recording level | Peaks at −6 to −3 dBFS | Loud enough, never clipping |
The Recording Workflow, Start to Finish
Once the front end is right, the actual capture is the easy part — maybe ten minutes of attention per side. Clean the record, set your input device in the software, play the loudest passage on the side and set your level so peaks land around −6 to −3 dBFS, then start recording, drop the needle, and let the whole side run uninterrupted. Don’t babysit it; just let it play.
The discipline is in the small things: record the side as one continuous file and split tracks afterward, leave a few seconds of lead-in and run-out so you don’t clip the first transient, and never adjust the gain mid-side. Capture both sides, then move to editing. The detailed click-by-click version lives in my how to digitize vinyl records guide, which is the step-by-step companion to this overview.
Cleaning Up: Declicking, Track Splitting, and Tagging
After the capture, light editing turns a raw side into a finished album. Split the continuous recording into individual tracks at the silences between songs, trim the lead-in and run-out, and apply gentle click removal only where you hear an actual tick. The temptation is to over-process — heavy noise reduction smears the music and makes it sound worse than the pops did. I use declicking surgically, on audible ticks, and leave the rest alone.
Then tag everything: artist, album, track titles, year, and embed the cover art. Untagged files are a mess to live with later. Export your lossless master, then batch-create compressed copies if you want them. The whole post-processing routine is software-specific, so the Audacity walkthrough and the software roundup cover the exact buttons.
Common Mistakes I See
The mistakes are predictable and every one of them is upstream of the computer. Recording a phono-level signal into a line input (thin, quiet, no bass) is the most common — it means there’s no phono stage in the chain. Skipping the clean is second, because the file is permanent. Setting levels too hot and clipping is third, and a clipped capture is unrecoverable. Over-processing with noise reduction is fourth, and chasing 192kHz while ignoring a dirty stylus is the classic “right effort, wrong place” mistake.
The other one worth naming: digitizing through a misaligned or worn cartridge and blaming the record. If your captures sound harsh on every record, the problem isn’t the records — it’s the stylus or the alignment. Fix the front end, and the same gear that gave you harsh files will give you gorgeous ones. That’s the entire thesis of this guide: the converter was never your bottleneck.
Storing and Backing Up Your Vinyl Archive
A digitized collection is only useful if it survives, and a single hard drive is not a backup — it’s a countdown. I keep my lossless masters in at least two places: a working drive and a separate backup, with anything irreplaceable also pushed to cloud storage. The rule I follow is the old photographer’s one, three copies on two types of media with one off-site, because a vinyl archive can represent hundreds of hours of capture time you cannot easily redo.
Organize as you go, not later. Folder by artist and album, embed the metadata and cover art at capture time, and keep the FLAC masters separate from the compressed listening copies so you never accidentally overwrite the good file. The discipline pays off the first time a record gets damaged or sold — the file is the only copy left, and a tagged, backed-up FLAC is worth the half hour it took to make. If you’re also rethinking how the physical collection lives, the way you store the records themselves feeds directly into how often you’ll need to re-clean before any future capture.
Is Digitizing Vinyl Worth It?
For most people, yes — but be honest about why you’re doing it. The strongest case is preservation: a record you love that’s getting worn, an out-of-print pressing with no decent reissue, or a collection you want portable without lugging the LPs. The weakest case is chasing some mythical “vinyl sound” on your phone — a good digital file captures exactly what’s in the groove, no more, and a streaming service already gives you a cleaner master of most mainstream titles.
Where it genuinely shines is the in-between catalog: rare pressings, regional releases, live bootlegs, and the records that never made it to streaming. Those are irreplaceable and worth doing properly. I’d rather have twenty carefully captured rarities than three hundred sloppy transfers of albums I can stream anyway. Pick the records that earn the effort, get the front end right, and the files will reward you for years. That selective approach is exactly why the spend-it-in-the-right-order discipline matters: you’re investing real time per side, so make each capture count.
Frequently Asked Questions
Do I need a special turntable to digitize vinyl?
No. Any turntable works as long as the signal passes through a phono stage before reaching your converter. A USB turntable bundles that in for convenience, but a regular deck plus a phono preamp and an audio interface gives a better, upgradeable result.
What sample rate and bit depth should I use?
Record at 24-bit and 96kHz for archiving. The 24-bit depth gives headroom to avoid clipping, which matters most. Sample rates above 96kHz just double file size without capturing anything the record or your ears contain.
Why does my vinyl recording sound thin and quiet?
You are almost certainly feeding a raw phono signal into a line input with no phono stage in the chain. The phono stage applies RIAA equalization and boosts the signal to line level. Without it, recordings are quiet, bass-shy, and harsh.
Should I clean records before digitizing them?
Yes, always. Every pop and tick you capture is permanent in the file, and most surface noise is dust rather than damage. A carbon-fiber brush plus a wet clean before recording removes the majority of avoidable crackle.
What file format should I save my vinyl rips in?
Save a lossless master in FLAC, WAV, or AIFF. FLAC is ideal: it is lossless, tagged, and roughly half the size of WAV. Make MP3 or AAC copies from the FLAC afterward for phones and cars; never digitize straight to a lossy format.
Is a cheap USB turntable good enough?
For casual archiving of worn records, yes. The bundled cartridge and phono stage are built to a price and you will hear it on quiet, high-frequency passages, but the file will be perfectly listenable. If you own a decent deck already, use it instead.