Why Cartridge Alignment Matters
Cartridge alignment is the process of positioning the stylus so it traces the record groove at the correct angle across the entire side of the record. A misaligned cartridge introduces distortion, causes uneven channel balance, and accelerates groove wear. Getting alignment right is one of the most impactful free upgrades you can make to any turntable — it costs nothing but 30 minutes of your time and can transform a harsh, sibilant sound into smooth, detailed playback.
The geometry problem is inherent to pivoted tonearms. Because the tonearm swings in an arc across the record, the cartridge can only be perfectly tangent to the groove at two points — called null points. Everywhere else, there is some angular error called tracking error. Proper alignment minimizes this error across the entire playing surface, keeping the stylus as close to tangent as possible where it matters most: the inner grooves, where distortion is worst due to the tighter groove curvature.
A poorly aligned cartridge sounds noticeably wrong. High frequencies become harsh and sibilant, especially on vocals and cymbals. Stereo imaging collapses — instruments that should be panned left or right smear toward the center. Inner groove distortion is the most common symptom: as the stylus approaches the label, the sound becomes increasingly gritty and fatiguing. All of these symptoms are correctable through proper alignment, which is why every turntable buying guide emphasizes setup over hardware.
Tracking Force: The Foundation of Proper Setup
Before aligning the cartridge, you must set the tracking force — the downward pressure the stylus exerts on the groove. Tracking force is measured in grams and specified by the cartridge manufacturer. A typical MM cartridge tracks between 1.5 and 2.5 grams. The Ortofon 2M Red specifies 1.8 grams. The Audio-Technica AT-VM95E specifies 2.0 grams. Always use the manufacturer’s recommended force, not a lower or higher value.
Too little tracking force causes the stylus to skip, mistrack during loud passages, and produce distortion because it cannot maintain consistent groove contact. Too much tracking force presses the stylus into the groove walls with excessive pressure, accelerating wear and dulling the sound. Research by Shure in the 1970s demonstrated that tracking force above a cartridge’s specification doubles groove wear per play — a significant concern for valuable or irreplaceable records.
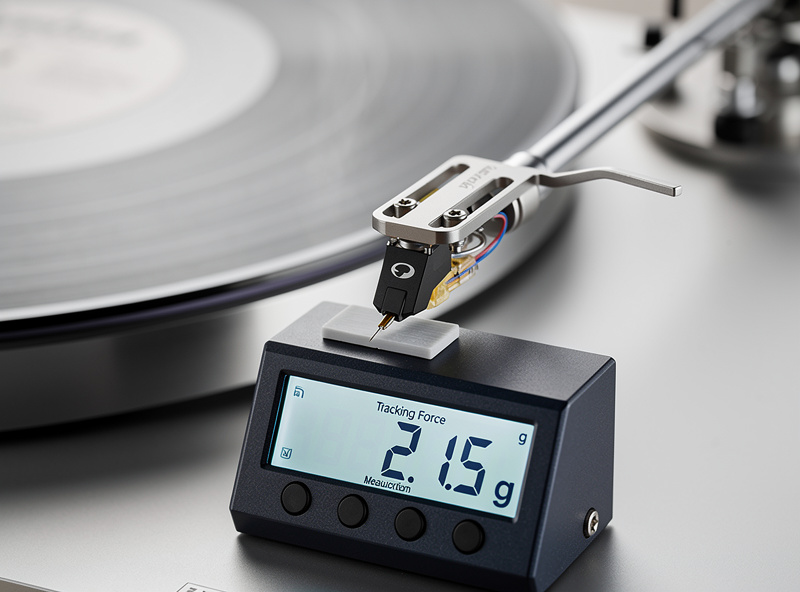
Set tracking force with a digital stylus force gauge ($10–$15 on Amazon). Do not rely on the tonearm’s counterweight markings alone — these are often inaccurate by 0.2–0.5 grams due to manufacturing tolerances. Place the gauge on the platter, zero it, and lower the stylus onto the gauge platform. Adjust the counterweight until the display reads the manufacturer’s specified force within 0.05 grams. Our phono preamp explained article covers how signal quality depends on proper mechanical setup.
Alignment Protractor Types Explained
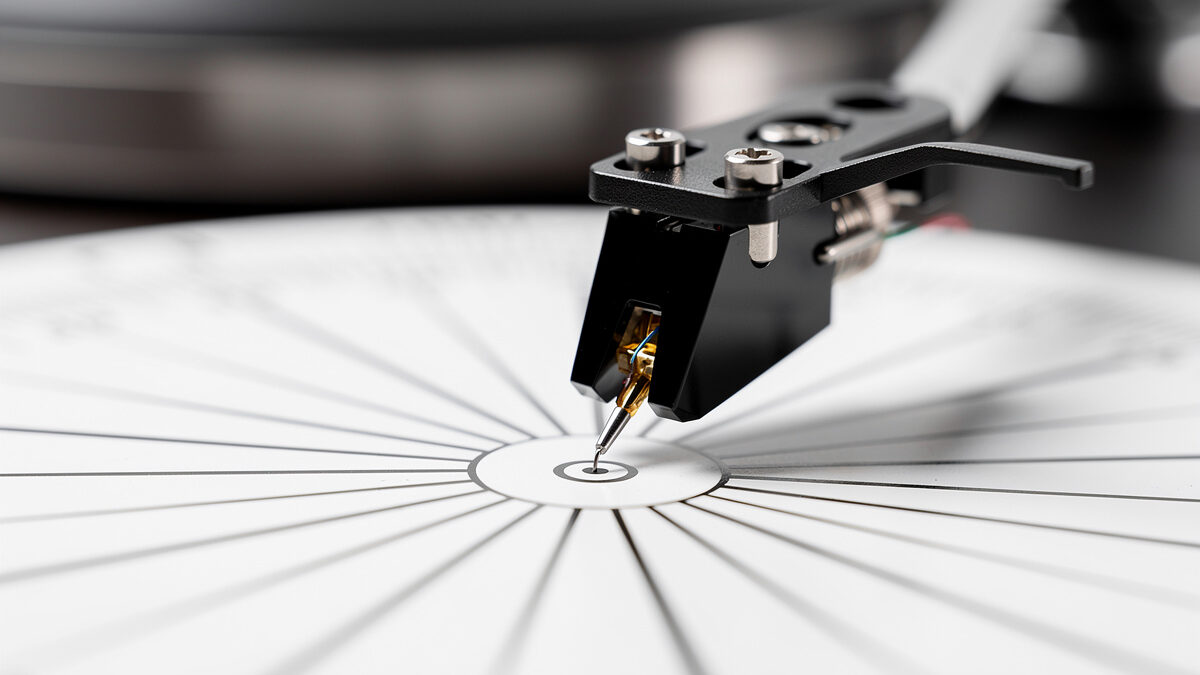
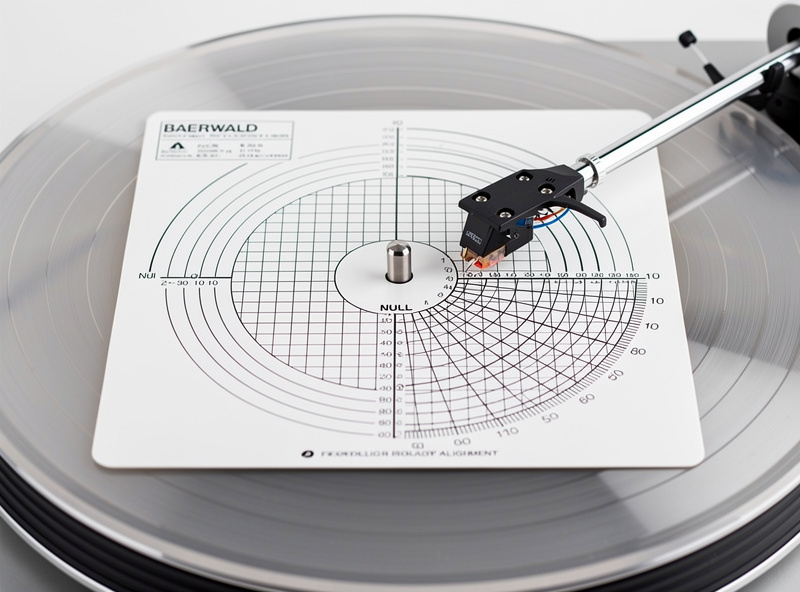
An alignment protractor is a printed or precision-cut template that shows where the stylus tip should sit at two null points along the tonearm’s arc. Three protractor geometries dominate the market, each optimizing tracking error differently.
Baerwald (also called IEC). This geometry places null points at 66mm and 120.9mm from the spindle center. Baerwald alignment minimizes the maximum tracking error across the entire record, making it the best all-around choice for most listeners. It distributes distortion evenly, avoiding the severe inner-groove distortion that other alignments can produce. Most free printable protractors online use Baerwald geometry.
Stevenson. Stevenson places null points at 60.325mm and 117.42mm. It prioritizes inner-groove accuracy by positioning one null point very close to the inner groove, reducing distortion where it is most audible. The trade-off is slightly higher tracking error on the outer grooves. Stevenson alignment is preferred for classical music and audiophile pressings where inner-groove detail matters most.
Lofgren (also called Lofgren B). Lofgren calculates null points based on the tonearm’s effective length and offset angle. It produces the lowest average tracking error but requires knowing your tonearm’s exact specifications. Lofgren is the theoretical optimum, but the practical difference between Lofgren and Baerwald is small — less than 0.5 degrees of tracking error in most cases.
For first-time alignment, use a Baerwald protractor. It is forgiving, widely available, and produces excellent results with any tonearm. If you are an experienced listener and find inner-grain distortion problematic, switch to Stevenson. Lofgren is for enthusiasts who want theoretical perfection and have the patience to calculate protractors for their specific tonearm geometry.
Step-by-Step Cartridge Alignment Process
Follow these steps precisely. Alignment requires patience and good lighting. Work on a stable surface and keep the tonearm locked in its rest until instructed.
Step 1: Gather tools. You need an alignment protractor (Baerwald recommended), a small flathead screwdriver or hex key (depending on your headshell bolt type), a tracking force gauge, and a magnifying glass or phone camera for close-up verification.
Step 2: Loosen the headshell bolts. Remove the headshell from the tonearm by unscrewing the locking collar. Loosen the two cartridge mounting bolts just enough that the cartridge can slide forward/backward and rotate slightly within the headshell slots. Do not remove the bolts — the cartridge should be loose but not falling out.
Step 3: Set the protractor on the platter. Place the protractor template on the platter with the spindle hole aligned. Some protractors have a center hole that fits over the spindle. Others sit flat on the platter surface. Ensure the template does not shift during alignment — a small piece of tape on the platter edge can secure it.
Step 4: Align the outer null point. Unlock the tonearm and gently lower the stylus onto the first null point grid (typically marked at 66mm for Baerwald). Look at the cartridge body from directly above. The cantilever — the thin tube that holds the stylus — must be parallel to the grid lines printed on the protractor. Slide the cartridge forward or backward in the headshell slots until the cantilever is perfectly parallel to the reference lines. Do not adjust angle yet.
Step 5: Align the inner null point. Lift the tonearm and swing it to the second null point (typically 120.9mm for Baerwald). Lower the stylus and check the cantilever alignment. It should also be parallel to the grid lines. If the cantilever is not parallel at this second point, you need to rotate the cartridge slightly within the headshell slots. Make small adjustments — one degree at a time — and recheck both null points until the cantilever is parallel at both positions.
Step 6: Tighten the headshell bolts. Once the cantilever is parallel at both null points, carefully tighten the cartridge mounting bolts. Apply equal pressure to both bolts, tightening a half-turn on each side alternately, to prevent the cartridge from shifting during tightening. Check alignment one final time after tightening — the act of tightening can sometimes rotate the cartridge by a fraction of a degree.
Step 7: Set tracking force. Reattach the tonearm to its rest. Use the digital gauge to set tracking force to the manufacturer’s specification. Recheck alignment if the tonearm counterweight was adjusted significantly.
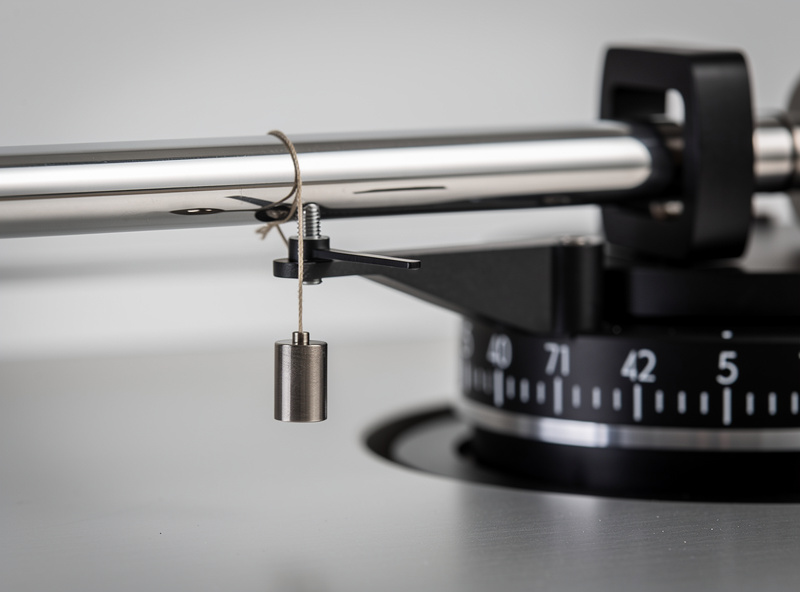
Step 8: Set anti-skate. Set the anti-skate dial to match your tracking force value. If tracking at 2.0 grams, set anti-skate to 2.0. Anti-skate applies a lateral force that counteracts the tonearm’s tendency to pull inward toward the center of the record due to friction in the groove.
Anti-Skate Setup in Detail
Anti-skate is a mechanism that applies a small outward force to the tonearm, counteracting the inward pull caused by friction between the stylus and the groove wall. Without anti-skate, the inner groove wall receives more pressure than the outer wall, causing uneven wear and channel imbalance — the left channel (inner groove) plays louder than the right channel (outer groove).
The standard rule is to set anti-skate equal to the tracking force. If you track at 1.8 grams, set anti-skate to 1.8. This is a starting point, not a final answer. The correct anti-skate setting depends on the stylus profile, groove condition, and tonearm friction. Some cartridges track better with slightly more or less anti-skate than the tracking force value.
Test your anti-skate setting by playing a record with consistent, sustained content — a piano or string passage works well. If you hear distortion favoring one channel, adjust anti-skate up or down by 0.2 increments until the image centers. A dedicated anti-skate test record with a silent groove is the most accurate method — the stylus should track the silent groove without skating inward or outward.
Over-applying anti-skate is a common mistake. Excessive anti-skate pulls the stylus toward the outer groove wall, increasing outer-groove wear and reducing bass response. Start at the tracking force value and adjust only if you hear a channel imbalance or if the stylus visibly drifts inward during playback.
Alignment Method Comparison
| Method | Null Points | Best For | Inner Groove Distortion | Outer Groove Distortion | Difficulty |
|---|---|---|---|---|---|
| Baerwald (IEC) | 66mm / 120.9mm | General listening | Low | Low | Easy |
| Stevenson | 60.325mm / 117.42mm | Classical, audiophile | Very low | Moderate | Moderate |
| Lofgren B | Calculated per arm | Theoretical optimum | Low | Low | Advanced |
| Manufacturer template | Varies | Specific tonearms | Varies | Varies | Easy |
Common Alignment Mistakes
Aligning with the headshell bolts tight. If the bolts are fully tightened, the cartridge cannot move, and you will never achieve proper alignment. Loosen the bolts enough for the cartridge to slide and rotate freely, then tighten only after both null points are aligned.
Ignoring the cantilever and aligning the cartridge body. The cartridge body may not be perfectly parallel to the cantilever. Always align based on the cantilever’s angle, not the cartridge shell. Use a magnifying glass to verify the cantilever is parallel to the grid lines.
Setting tracking force by ear. Tracking force must be set with a gauge. Guessing by feel or by counterweight markings introduces errors of 0.2–0.5 grams, which is enough to cause mistracking or accelerated wear. A $12 digital gauge removes all guesswork.
Forgetting to recheck after tightening. Tightening the headshell bolts can shift the cartridge by a degree or two. Always verify alignment at both null points after tightening. If the alignment shifted, loosen, readjust, and tighten again with less force.
Skipping alignment entirely. Many turntables ship with the cartridge pre-installed and allegedly pre-aligned. Factory alignment is often approximate — good enough to play records but not optimized. Taking 30 minutes to verify and adjust alignment with a protractor makes an audible improvement on every turntable, including models costing $1,000+.
How Often Should You Re-Align?
Re-align your cartridge whenever you change cartridges, remove the headshell, or notice a change in sound quality. Vibrations during transport can shift the cartridge within the headshell slots. If you move your turntable to a new location, check alignment before playing records. Regular re-alignment is not necessary if the turntable stays in one place and the headshell is not removed.
Replace the stylus every 500–1,000 hours of play. When you replace the stylus on a removable-stylus cartridge (like the Ortofon 2M series), alignment does not change because the cartridge body remains mounted. If you replace the entire cartridge, re-align from scratch using the full protractor process.
Frequently Asked Questions
How long does cartridge alignment take?
A first-time alignment with a protractor takes 20–40 minutes. Once you understand the process, subsequent alignments take 10–15 minutes. Most of the time is spent making tiny adjustments and rechecking both null points. Rushing produces poor results.
Can I align a cartridge without a protractor?
Aligning by eye without a protractor is unreliable and produces significant tracking error. A printable Baerwald protractor is free to download and prints on standard paper. For $15–$30, precision-machined aluminum protractors offer better accuracy. Always use a protractor.
What happens if my cartridge is misaligned?
A misaligned cartridge causes distortion (especially on inner grooves), sibilance on vocals, channel imbalance, and accelerated record wear. The stylus contacts the groove at the wrong angle, reading the walls incorrectly. Proper alignment eliminates these symptoms on most systems.
Should I use Baerwald or Stevenson alignment?
Use Baerwald for general listening across all genres. It provides the best balance of low distortion across the entire record. Switch to Stevenson only if you listen primarily to classical or acoustic music and notice inner-groove distortion that Baerwald does not resolve.
Do I need to re-align after replacing a stylus?
No, if you replace only the stylus on a removable-stylus cartridge, the cartridge body position is unchanged. Alignment is preserved. If you replace the entire cartridge, you must re-align from scratch because the new cartridge’s mounting geometry may differ.
What tracking force should I use?
Always use the tracking force specified by the cartridge manufacturer. Typical MM cartridges track between 1.5 and 2.5 grams. The Ortofon 2M Red specifies 1.8 grams. Set force with a digital gauge for accuracy within 0.05 grams. Never exceed the maximum rated force.
Related Articles
- Turntable Buying Guide 2026: How to Choose Your First Record Player
- Belt Drive vs Direct Drive Turntables: Which Is Better for Vinyl?
- Phono Preamp Explained: Why You Need One and How to Choose
- Vinyl Record Care Guide: Protect Your Collection for Decades
- Record Storage Tips: Keep Your Vinyl Collection Safe