The five highest-value 3D-printed turntable accessories in 2026 are alignment protractors (Baerwald, Loefgren, and Stevenson geometries), counterweight stub extensions, custom headshells in PETG or PLA-CF, record clamp bodies, and tonearm cable strain reliefs. Each one solves a specific turntable problem with under $5 of filament and is functionally equivalent to commercial accessories costing $30-$200 — assuming the print quality is good enough to actually deliver the geometry the design calls for.
Vinyl audiophiles and 3D printer owners are an underrated overlap. The need is concrete: a Baerwald protractor that costs $35 from Mobile Fidelity is a 30-minute print on any modern hobby printer; a custom 9 inch headshell drilled for the exact cartridge spec costs $80-$120 commercially and prints in 90 minutes for $1.80 of PETG. The catch is that “3D printed” alone does not equal “audiophile-grade” — print quality, material choice, and the post-processing that most YouTube tutorials skip determine whether the printed part actually performs.
What Print Quality Means for Audio Accessories
Three quality requirements separate audiophile-grade prints from generic hobbyist prints. First, dimensional accuracy: a cartridge alignment protractor must be within 0.2 mm of design dimensions across the print or the alignment is wrong by enough to introduce audible distortion. Second, material rigidity: PETG is the right default for headshells and counterweights; soft TPU or thin-walled PLA add unwanted resonance. Third, surface finish: the printed surface that contacts cartridge mounting points or platter surfaces needs to be smooth or it transmits micro-vibration into the signal.
The print settings that meet these requirements: 0.4 mm nozzle, 0.16 mm layer height, 4 walls (perimeters), 30-50% gyroid infill, 230 °C nozzle for PETG. The slicer profile that gets you there is in our partner site’s best 3D printer slicer software 2026 guide — that comparison covers Cura, PrusaSlicer, and Bambu Studio for exactly this category of precision-required functional prints. Get the slicer profile right first; the rest is straightforward.
The 5 Accessories Worth Printing
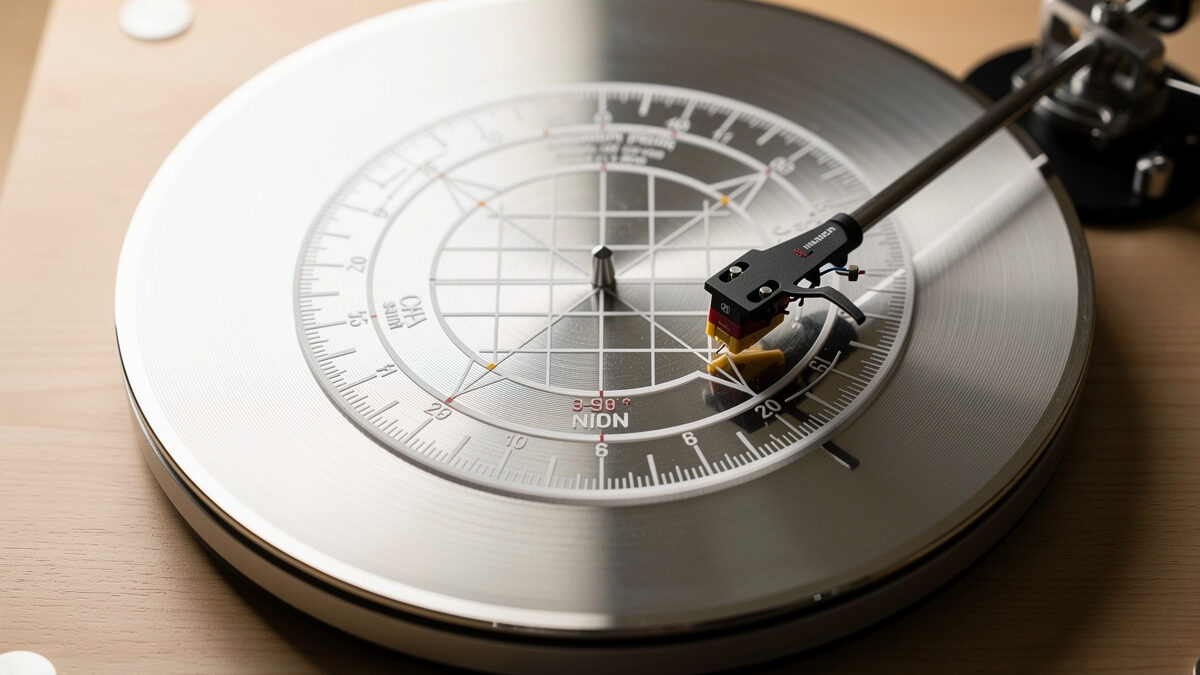
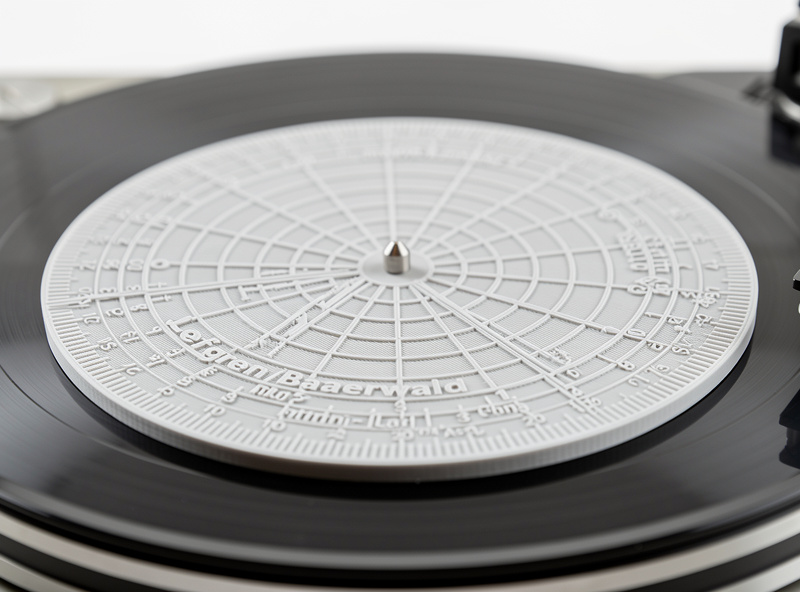
1. Cartridge Alignment Protractor (30 min print)
The single highest-value print for any vinyl owner who has changed a cartridge. Three geometries dominate — Baerwald (lowest distortion average across a record), Loefgren (lowest peak distortion), and Stevenson (lowest distortion at inner grooves). Most modern cartridges and tonearms target Baerwald.
Print in PLA at 0.16 mm layer height. PETG works but the slight surface texture makes reading the alignment grid harder. Free Baerwald and Loefgren STLs are available on Printables (search “Baerwald protractor”). After printing, cross-check accuracy against a printed paper protractor from VinylEngine — the printed plastic version should match the paper version within 0.5 mm at the spindle hole.
For the broader cartridge alignment workflow — pivot-to-spindle distance, overhang, offset angle — our cartridge alignment guide covers the whole protocol that the printed protractor supports.
2. Counterweight Stub Extensions (45 min print)
Modern tonearm counterweights are designed for cartridges in the 8-12 g range. Heavy modern moving-coil cartridges (Hana ML at 10.5 g, Ortofon Cadenza Bronze at 10.7 g, Audio-Technica AT-OC9XSL at 8.8 g) push some counterweights to the end of their thread — and any rigid-mount cartridge above 12 g may not balance at all on a stock counterweight.
The fix is a printed stub extension that adds 5-15 g to the counterweight mass. Print in PETG at 100% infill, design for a slip-fit over the existing counterweight thread plus a small grub screw to lock. The 3D-design step takes 20 minutes in Fusion 360 or even Tinkercad; the print is 45 minutes.
3. Custom Headshells (90 min print)
A printed PETG or PLA-CF headshell drilled for a specific cartridge mounting pattern outperforms generic universal headshells in two ways: tighter fit (no shimming required) and exact mass tuning to match the cartridge-tonearm pairing. PLA-CF (carbon fibre filled PLA) is the right material here because of its inherent vibration damping; pure PETG works at slightly higher mass.
The community design library on Printables has dozens of printable headshells targeting specific cartridges (Sumiko, Ortofon, Audio-Technica). Print at 0.12 mm layer height with 5 walls, 50% gyroid infill, then sand the cartridge contact face flat with 600 grit on a granite reference surface. The sanding step is what most YouTube tutorials skip; without it, the cartridge sits at an angle and the alignment protocols above are useless.
4. Record Clamp Bodies (60 min print)
A 240 g record clamp damps platter resonance and improves stylus tracking on slightly warped records. Commercial brass clamps are $40-$120; a printed clamp filled with steel BBs in a sealed cavity hits the same mass spec for $4 of filament and $3 of BBs.
The 3D design pattern: a hollow cylindrical clamp with a sealed bottom cavity, a fill port (sealed afterward), and a recess matching the spindle hole. PETG at 100% infill on the contact face, 30% on non-functional sections. Total print mass: 60 g of plastic plus 180 g of BBs in the cavity.
5. Tonearm Cable Strain Reliefs (15 min print)
The smallest print on this list and the most overlooked. Aftermarket tonearm cables (van den Hul, Cardas, Discovery) are stiffer than OEM cables and put torque on the tonearm pivot if not properly relieved. A 5 g printed strain relief that snaps onto the rear of the plinth eliminates the issue completely. PLA at 0.20 mm layer height; design takes 10 minutes per turntable model.

Filament Choices That Matter
Three filaments cover this entire category:
PETG (default): Right answer for headshells, counterweight stubs, and record clamps. Stiff enough not to introduce resonance, easy to print, dimensionally stable in the 60-90 °F range turntables actually live in.
PLA-CF (carbon fibre filled): Higher stiffness and inherent vibration damping. Worth the extra cost for headshells specifically. Requires a hardened steel nozzle (regular brass nozzles wear out fast on CF). PrintForgeHQ’s carbon fibre filament guide covers the brand comparison.
Pure PLA: Acceptable only for the alignment protractor (which is a measurement tool, not a vibration-load part) and the strain relief. Avoid for any audio-signal-path component.
Avoid: ABS (warps and is hard to print, no audio benefit over PETG), TPU (too soft, adds resonance), ASA (no advantage indoors).
Print Settings Reference Table
| Accessory | Filament | Layer Height | Walls | Infill | Print Time | Cost |
|---|---|---|---|---|---|---|
| Baerwald protractor | PLA | 0.16 mm | 3 | 20% | 30 min | $0.40 |
| Counterweight stub | PETG | 0.20 mm | 5 | 100% | 45 min | $1.20 |
| Custom headshell | PETG or PLA-CF | 0.12 mm | 5 | 50% gyroid | 90 min | $1.80-$3.00 |
| Record clamp body | PETG | 0.20 mm | 4 | 100% face / 30% body | 60 min | $1.40 |
| Cable strain relief | PLA | 0.20 mm | 3 | 30% | 15 min | $0.20 |
What 3D Printing Doesn’t Replace
The signal-path components that should not be 3D printed: cartridges (cantilever and stylus geometry need precision-machined boron or aluminum), tonearms (bearings and machined pivot points are well outside hobby-print tolerances), platters (mass and rotational moment of inertia matter), and motors. Print the small accessories; buy the structural and signal-path components.
The accessories above also don’t replace good fundamentals: alignment, tracking force, anti-skate, dust care, and routine cleaning. Our turntable upgrade guide covers the broader upgrade path; the tracking force and anti-skate setup guide is the natural next read after a printed protractor lets you align properly.
Where to Find STL Files
Printables and Thingiverse are the largest free sources. Search “turntable” or specific cartridge model on Printables; sort by remix count to find designs that have been validated by hundreds of users. Cults3D has a small paid section with higher-polish designs at $5-$15 each. The audiophile community on AudioKarma has a “DIY accessories” forum thread with curated free STLs that has been growing for several years.
For the broader 3D printing context — choosing a printer, dialing in a slicer profile, the difference between $300 and $1000 hobby printers — see PrintForgeHQ’s best 3D printer 2026 buyer’s guide. Any printer at the $400 price point or above prints these accessories without compromise.
Frequently Asked Questions
Are 3D printed turntable accessories actually high quality enough for audiophile use?
Yes, with the right material and print settings. PETG headshells and counterweights at 0.12 to 0.16 mm layer height, 4 to 5 walls, and 30 to 50 percent gyroid infill match commercial alternatives in stiffness and dimensional accuracy. PLA-CF (carbon fibre filled) headshells outperform many sub-100 dollar commercial headshells in vibration damping.
What is the best filament for a 3D printed headshell?
PETG for the default audiophile-grade headshell, PLA-CF for higher stiffness and inherent vibration damping at extra cost. Avoid pure PLA for headshells (degrades over time), TPU (too soft, adds resonance), and ABS (no advantage over PETG for indoor turntable use).
How accurate does a 3D printed alignment protractor need to be?
Within 0.2 mm of design dimensions across the print. Cross-check by overlaying the printed protractor on a paper Baerwald protractor from VinylEngine — the spindle holes should align within 0.5 mm. Beyond that, the cartridge alignment will be wrong by enough to introduce audible distortion.
Can I print a record clamp myself?
Yes for the body, no for the mass — a printed PETG shell filled with steel BBs in a sealed cavity hits the 200 to 240 gram clamp mass spec for under 7 dollars total. The print is straightforward; the BB fill is the part that matters for actually damping platter resonance.
Which 3D printer do I need for these accessories?
Any modern hobby printer at the 400 dollar price point or above. The Bambu A1, Prusa MK4, Creality K1C all print PETG and PLA-CF reliably out of the box at the precision audiophile accessories require. Sub 200 dollar printers can also work but require more dialing in.
Where can I find STL files for turntable accessories?
Printables.com is the largest free source — search turntable or your specific cartridge model and sort by remix count. Thingiverse covers similar territory. Cults3D has a small paid section at 5 to 15 dollars per design. The audiophile community on AudioKarma maintains curated free STL threads with multi-year validation.