Anti-skate is the outward force that cancels the inward pull dragging your stylus toward the record’s center. Set it roughly equal to your tracking force as a starting point — 1.8 grams of tracking force, 1.8 on the anti-skate dial — then refine by listening for one channel distorting before the other. Get it wrong and you wear one groove wall faster than the other and lose tracking on the channel that is starved of contact.
It is the most misunderstood adjustment on the deck: some people obsess over it, others ignore it entirely, and both are wrong. Here is what it actually does and how I set it, as part of the full turntable setup and calibration guide. Set tracking force first, because anti-skate is referenced to it.
What Anti-Skate Corrects
A pivoted tonearm does not track straight across the record — it swings on an arc, and the offset angle of the headshell combined with groove friction creates a net force that pulls the whole arm inward toward the spindle. This is the skating force. Left uncorrected, the stylus presses harder against the inner groove wall (the right channel) than the outer wall (the left channel). Anti-skate applies a small, opposing outward bias to even that pressure out so the stylus sits centered between both walls.
The payoff is symmetrical tracking: both channels read their groove wall with equal contact, both walls wear evenly, and the stereo image stays balanced. The skating force is not constant across the record, which is why anti-skate is a close approximation rather than a perfect cancellation — but a close approximation is hugely better than none.
The Starting Point: Match Your Tracking Force
The reliable first setting is to dial anti-skate to the same number as your tracking force. If you track at 1.8 grams, set the anti-skate dial to 1.8. If your deck uses a hanging weight on a thread looped over a post, hang it on the position the manual maps to your tracking force. This gets you within a hair of correct on most decks, because manufacturers calibrate the two scales to roughly correspond.
From there you refine. The skating force depends on the cartridge, the stylus profile, and where on the record you are, so the matched-number starting point is an excellent approximation that a quick test then confirms or nudges. Most of the time it needs no change at all.
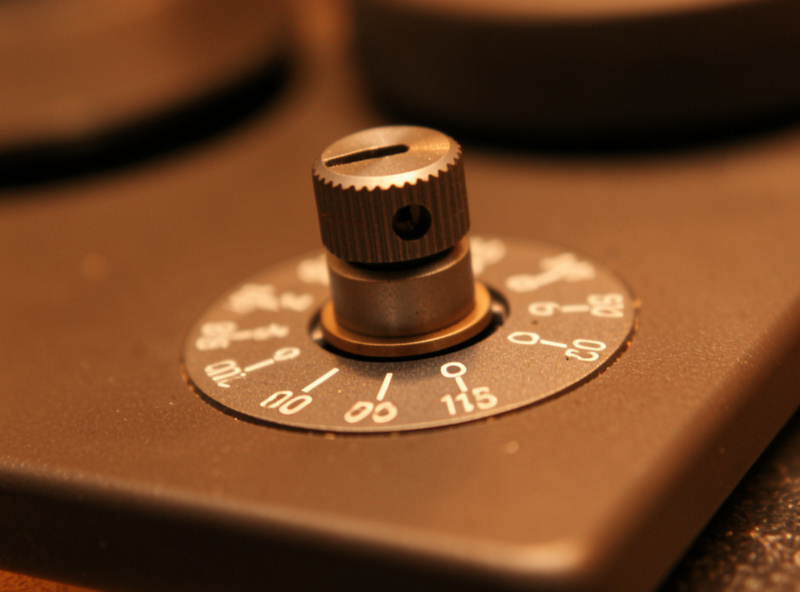
Know Your Anti-Skate Mechanism
Decks apply anti-skate in one of a few ways, and knowing which you have changes how you set it. A numbered dial or knob near the arm base is the most common; you just turn it to a value. A thread-and-weight system hangs a small weight on a filament looped over a pin, with different notches giving different force. Some arms use a magnetic or spring mechanism with a calibrated dial. A few minimalist arms have no anti-skate adjustment at all and rely on a fixed internal bias.
Whatever the mechanism, the principle is identical: apply an outward bias matched to the inward skating pull. The numbers on dial-type adjusters are calibrated to grams of tracking force, which is why matching your VTF number is the right starting move.
The Blank-Record Test (and Its Big Caveat)
The classic test is to cue the stylus onto a smooth, grooveless surface — a blank record or the run-out area — and watch which way the arm drifts. With anti-skate too low, the arm slides inward toward the center; too high, it drifts outward toward the edge; about right, it barely moves. It is a useful sanity check that confirms your bias is in the right ballpark and pointing the right direction.
Here is the caveat every setup guide should state: a grooveless surface has far less friction than a real groove, so the skating force during the test is not the same as during playback. The blank-record test is excellent for catching gross errors — anti-skate wildly too high or too low — but it is not precise enough to be your only method. Use it to get close, then trust your ears or a test record for the final setting.

The Listening Test That Actually Settles It
The method I trust most is listening for tracking balance on a demanding passage. Play a loud, complex track — massed strings, a belted vocal, anything that pushes the stylus hard — and listen for distortion that favors one channel. If the right channel breaks up or sounds harsh first, anti-skate is too low; raise it slightly. If the left channel distorts first, it is too high; lower it. When both channels break up together (at a much higher level than you would ever play), the bias is balanced.
A test record with dedicated anti-skate tracks makes this easier by providing progressively harder tracking signals, but a well-chosen loud passage from your own collection works. Adjust in small increments, listen to the same passage each time, and stop when neither channel leads the other into distortion. That is the setting that protects both groove walls equally.
Signs Your Anti-Skate Is Wrong
Beyond the listening test, a few symptoms point at anti-skate. Persistent distortion in one channel only, especially the right, suggests too little bias. A stylus that visibly slides quickly across a stationary record when lowered means the bias is far off in one direction. Uneven stylus wear, visible under magnification as more wear on one side of the tip, is the long-term tell. And a stereo image that pulls noticeably to one side, with tracking force and azimuth already correct, can point back to anti-skate. When in doubt, return to the matched-VTF starting point and re-run the listening test from there.
How Precise Does It Need to Be?
Less precise than tracking force, more than nothing. Anti-skate is a broad adjustment — being within a couple of tenths of correct is fine, and chasing perfection past that is wasted effort, especially since the ideal value changes across the record anyway. Set it to match your tracking force, confirm with a quick listen on a hard passage, and leave it. Recheck only when you change tracking force, swap the cartridge, or notice the symptoms above. It is a set-and-forget adjustment once it is close, which is exactly why the people who skip it entirely are leaving easy, free tracking quality on the table.
Frequently Asked Questions
What should I set my anti-skate to?
Start by matching anti-skate to your tracking force: if you track at 1.8 grams, set the anti-skate dial to 1.8. Manufacturers calibrate the two scales to correspond, so this lands you very close. Then refine by listening for one channel distorting before the other on a loud passage.
Do I really need anti-skate?
Yes, on a pivoted tonearm. Without it, groove friction pulls the stylus inward and it presses harder on the inner groove wall, causing uneven wear and one channel mistracking before the other. Anti-skate evens the pressure so both walls wear equally and both channels track cleanly.
Is the blank-record test for anti-skate accurate?
Only roughly. A grooveless surface has much less friction than a real groove, so the drift test does not reproduce playback conditions. It is great for catching gross errors and confirming direction, but use a listening test on a demanding passage for the final setting.
What happens if anti-skate is too high?
Too much anti-skate pushes the stylus harder against the outer groove wall, so the left channel distorts first, that wall wears faster, and the stereo image can pull toward one side. If your left channel breaks up before the right on loud passages, lower the anti-skate slightly.
Should I set anti-skate before or after tracking force?
After. Anti-skate is referenced to your tracking force, so set and confirm tracking force with a gauge first, then dial anti-skate to match that number and refine. Whenever you change tracking force or swap the stylus, recheck anti-skate as well.